Wednesday, November 9, 2016
DIY Facial Scrub
There are many natural facial scrub recipes that you can use with everyday ingredients that you have in your kitchen but my favourite is honey and cinnamon. I always have a ton of canning jars around the house. I take one of my smaller ones that holds about 1/4 cup and fill with honey and then add a few tsp of ground cinnamon. I like my scrub to feel grainy so I typically add more cinnamon but you can reduce the amount of cinnamon to your preference in texture. The cinnamon will act as the exfoliant and honey is a great moisturizer. Rub this scrub on your face when you first get in the shower and let sit for a few minutes while you continue your shower. Then rinse off once your shower is complete and your face will feel amazing I promise! :)
Sunday, November 6, 2016
All About Baking Soda
Until I turned my household around and started going natural, the only time that I ever grabbed for the baking soda was to add it to my baking or to deodorize my fridge. I quickly found out that when I started looking for recipes for homemade products that baking soda was an ingredient that I kept seeing over and over. There are so many uses for baking soda and here are a list of some of it's wonderful uses:
-toothpaste
-facial scrub
-antacid
-deodorant
-insect bites
-washing hair
-cleaning pots/pans
-stove top cleaner
-oven cleaner
-boost for laundry
-removes oil and grass stains
-deodorizer
-unclog drains (when vinegar is added)
-put out small grease fires
-fruit and vegetables scrub
Baking soda is so easy to find and is very inexpensive. You can save a lot of money on some of the products you buy and just use baking soda instead. Enjoy! :)
Friday, November 4, 2016
How Much Water Should You Be Drinking
I've always wondered how much water should I actually be drinking daily and came across this chart when doing some research on it. It says to drink 1 glass for every 20 lbs of your body mass daily. Makes sense since our bodies are made up of approx. 80% water and needs this water to function optimally. It might seem like a lot to some but when you carry around a water bottle with you it's pretty easy. I used to think the same thing until I put at water bottle at my desk. Sometimes people don't realize that your dizzy spells or headaches are caused by dehydration. Drink up people! :)


Monday, October 31, 2016
Natural Headache Remedy
About a year ago I ditched the pain meds from the drug store and have been using turmeric mixed with honey for pain relief from headaches for my family. Turmeric is excellent for pain relief and swelling but my kids are really not fans of it. Yesterday when my son had a headache but didn't want to take the turmeric mixture I said to myself there has to be other remedies that I have in the house that I can use that won't make him complain and moan everytime. And there was! Peppermint oil and sips of cold water. I rubbed some peppermint oil at the center of his forehead where his headache was and told him to relax on the couch and take sips of the cold water. The peppermint oil gives the skin a cooling sensation. Within 15 minutes he went from complaining and rubbing his head to joking and playing. I was really impressed so I will use that on myself from now on. You can find peppermint oil at almost all grocery stores and if not then at your local health store. I always have some on hand for my soap and toothpaste recipes. Hope this works for you! :)
Sunday, October 30, 2016
DIY Halloween Decorations
Halloween is just a day away and it can get costly to buy already made decorations. Here are a few things that I made this year for our Halloween party that only cost $15.


 |
| I bought some Halloween masks at the dollar store, put them in glass jars and let a tea bag soak overnight to give a murky look to the water. I had to cut the elastics off and trim the masks to make them sit right in the jars but they look pretty good. |
 |
| Where would Halloween be without the poisonous concoctions! I bought glass bottles and Halloween labels at the dollar store. I filled them all with water and added food colouring based on the label names. Vampire Blood I made red, Spider Venom was orange, Witch's Brew was a really dark purple etc... |
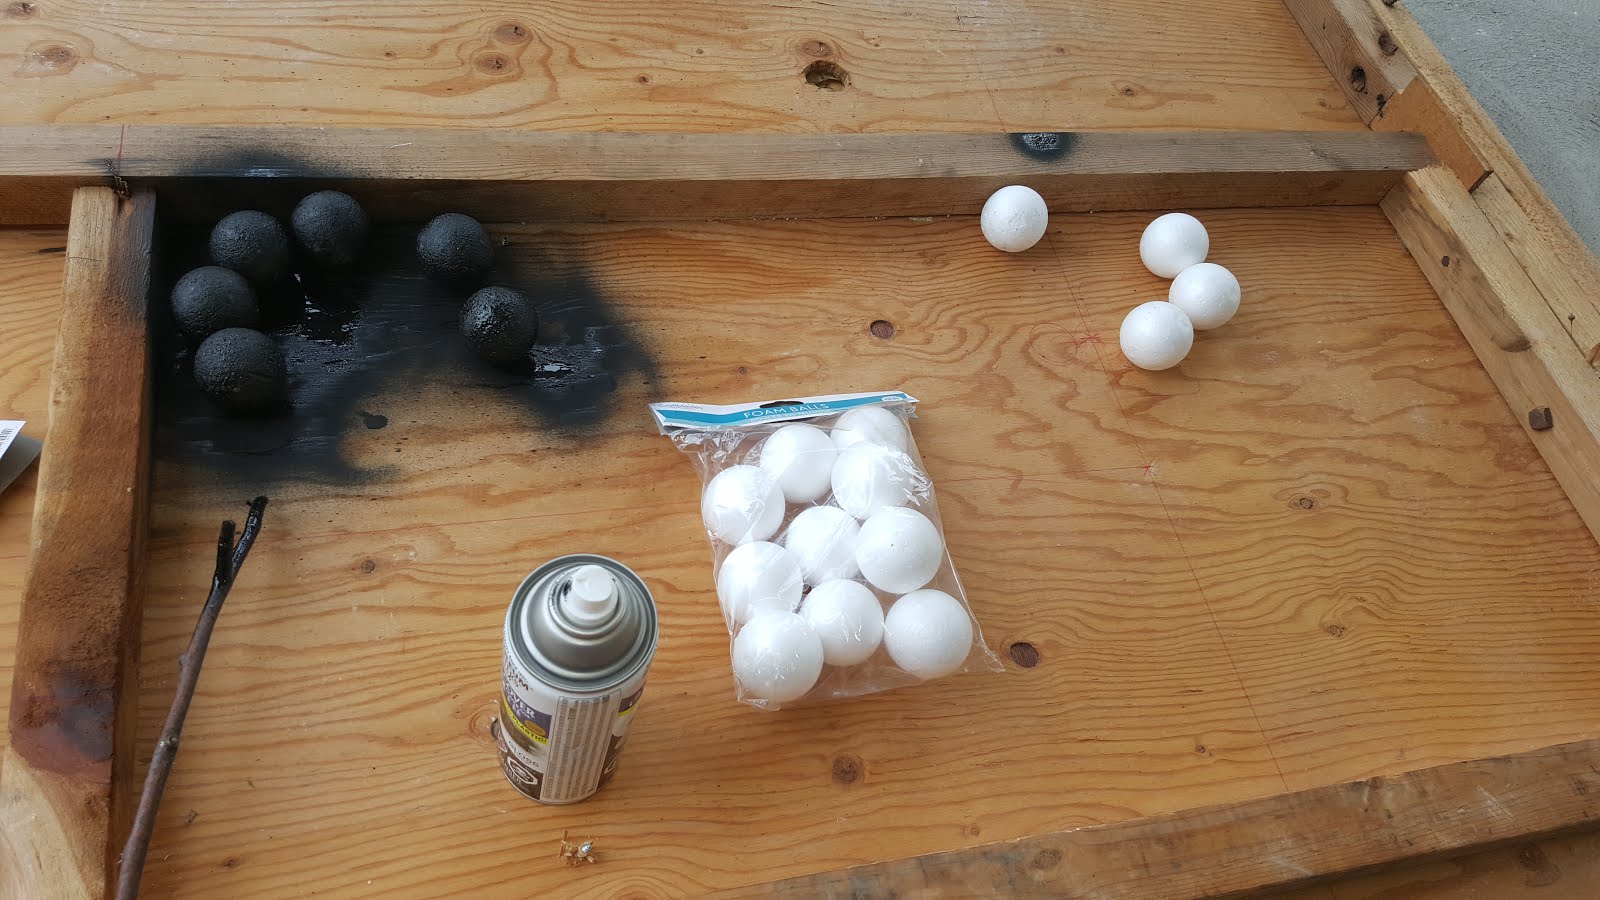

I wanted to make simple table decorations so I bought styrofoam balls and Halloween themed flowers from the dollar store. I already had a can of black paint so I painted the styrofoam black and let dry. I cut the down the flower stems and pierced the ends through the styrofoam balls and replaced the spiders on the flowers. You could also turn these styrofoam balls into spiders with pipe cleaner and some eye balls. There are so many DIY projects that you can do to decorate for Halloween and stay within your budget. Happy Halloween!
Thursday, October 27, 2016
Caught a Cold? Foods That Can Help
I rarely ever get sick but I am in the process of getting my thyroid back in balance. When my thyroid is out of whack I always get sick. I'm just getting over a cold and thought I would put a list together of foods that most people would have around the house that can help flush that cold out faster. Here is a list of them and how they help :
1) Garlic: Fights infections from bacteria and viruses.
2) Onions: Breaks up the mucus in the head and chest.
3) Ginger: Reduces fever, soothes sore throat and helps remove mucus from chest.
4) Horseradish: Strengthens immune system and increases blood flow to where cold and flu infections are to remove wastes.
5) Cayenne Pepper: Helps immune system fight cold and flu as it's a rich source of vitamin C.
6) Honey: Has anti-bacterial, anti-viral and anti-microbial properties.
7) Cinnamon: Has anti-inflammatory, anti-bacterial and antioxidant properties.
8) Lemon: Decreases the strength of cold and flu, reduces phlegm.
When I'm sick I normally brew some ginger and lemon in some hot water like a tea. Then I take a combo of raw unpasteurized honey and cinnamon in place of cough syrup 3 times a day. Works really well. You can try these when your sick or just incorporate them in your meals to boost your immune system and help prevent from even getting sick. :)
Wednesday, October 26, 2016
How to unclog your drain without using draino
Remember when you were back in grade school and you did the volcano experiment. Who knew that would come back to you and be of use later on in life. That's right. If you have a drain in your kitchen or bathroom that is not draining right, all you need is baking soda and vinegar. Make sure that the stopper is out of the way before you pour your baking soda, I would say about a 1/2 cup. Then pour about 1 cup of vinegar down right after and let the magic happen. Let it sit for about 10 minutes. Then pour some boiling water down the drain to rinse it down. If you have a really stubborn clog you might need to repeat this step 1 or 2 more times. It's inexpensive and these are ingredients you normally have in your household. :)
Tuesday, October 25, 2016
DIY Toothpaste Recipe
I've been using baking soda or a combo of baking soda and coconut oil as my toothpaste for about a year now. I came across another toothpaste recipe and had to try it because my kids are really not impressed with the new toothpaste. LOL If only everything could taste like candy right!
Ingredients:
4 tbsp coconut oil
2 tbsp baking soda
1 tbsp xylitol (can use stevia extract as well)
20 drops of cinnamon essential oil
20 drops of peppermint essential oil
After I added all theses ingredients I ended up adding some more baking soda and essential oil for texture and taste preference. My husband likes to be able to feel the peppermint burning in his soul. Haha!


I tripled this recipe as I have a family of four and poured the toothpaste in my little glass jars with lid. And done! Baking soda or baking soda and coconut oil work just fine but again I was trying this recipe for taste to see if adding the xylitol would even make a difference. You can find xylitol at some grocery stores or at your local health store. Enjoy!
Monday, October 24, 2016
2 Coconut Oil Soap Recipes
I've been making my own soap for almost a year now. I'm not even close to being an expert but have a pretty good understanding of the process. I keep my soap extremely basic and colour free because this is for my personal use and colour is just so that your bars look nice. I can close my eyes and pretend they're pretty. Haha So the easiest and best cleansing soap I've made to date is from straight coconut oil. I make 2 different coconut oil recipes. One is for laundry which is superfatted at 1% and the other is to wash hair and body which is superfatted at 20%.
Recipe #1 for laundry
33 oz coconut oil
5.9 oz lye
12 oz water
0.5-1 oz essential oil (optional, I don't use any scent)
Recipe #2 for hair and body
33 oz coconut oil
4.8 oz lye
9.6 oz water
1.5 oz essential oil (my favourite is lemon or peppermint bars)
Both of these recipes are made the same way. If you have never made your own soap before I would do some research on it first. The reaction between lye and water can be extremely dangerous if not done correctly. Always add the lye to the water to avoid this type of reaction and always wear protective gear such as goggles, gloves, long sleeves and mask. Safety first!
1) Measure out all of your ingredients. Make sure that the containers that you are using are for your soap making only. You don't want to cross contaminate with food.
2) Pour your lye into your water. I normally do this outside as the initial gases created can be quite strong. Once mixed I bring it back in the house. The reaction between the lye and water will make the liquid extremely hot so be careful.
3) Melt your coconut oil on your stove. Place a thermometer in the container to keep track of the temperature. You don't need the coconut oil so hot as coconut will melt quickly but you want the lye mixture and coconut oil to be about the same temperature when mixing. I heat my coconut oil to about 130-140° and then remove from the stove to cool.
4) Place a thermometer in the lye mixture and wait til the temperatures of both cool down to about 110°-120°. Some soap makers mix at different temperatures but this works just fine for me.
5) When the desired temperature has been reached mix the coconut oil and lye water together.
6) With a stick blender you will mix them together until you reach something called trace. You will know it has been reached when you mixture looks like pudding. This is the point where I add my essential oil. Do some research as every essential oil reacts different and might need to be added at a different step or temperature. Now back to tracing. It can take 5-10 minutes to reach but you will know when you get there. A blending stick is about $12 so please invest in one. I tried doing this with a mixer and it took about 45 minutes. Go buy the stick blender! lol
7) Pour in soap mold. If you don't have a soap mold you can place parchment paper inside a loaf pan.
8) Place in the oven at 165° for about an hour.This step will speed up the curing process. Normally you would let your bars cure for about 4-6 weeks to let the lye cure out of your bars before use. This oven hot process will speed up the curing process and could be used the next day or within a few days as long as the pH levels test normal.
8) Place in the oven at 165° for about an hour.This step will speed up the curing process. Normally you would let your bars cure for about 4-6 weeks to let the lye cure out of your bars before use. This oven hot process will speed up the curing process and could be used the next day or within a few days as long as the pH levels test normal.
8) Let your bars cool overnight and then take them out of the molds.
9) Test your bars with pH papers, the zap test or red cabbage test that I mentioned in my previous post 100% coconut oil soap recipe.
Voilà! Ready to use soap bars for laundry or for the shower. There are many on-line tools for soap making. I use the website The Sage to help with my lye, water and fragrance calculations when making a new recipe. Create your own recipes and have fun with it! :)
Voilà! Ready to use soap bars for laundry or for the shower. There are many on-line tools for soap making. I use the website The Sage to help with my lye, water and fragrance calculations when making a new recipe. Create your own recipes and have fun with it! :)
Sunday, October 23, 2016
Make Your Own Washing Soda
Washing Soda is available in the laundry aisle at most grocery stores but every time I need some they are always out. That's when I did some research and found that you can make your own washing soda out of baking soda. All you need to do is pour a thick layer of baking soda on a cookie sheet and put in the over at 400° for about an hour.
I tried to take some pictures of before and after but you can't really tell the difference but before putting into the oven the baking soda looks like shiny flour and is fluffy. After when it has turned into washing soda it turns grainy and matt. If you still see some shiny parts it just means that your layer was too thick. Just stir and put in the over for a few more minutes. That's it. When done let it cool. Then your washing soda is ready to use on any of your DIY recipes. I use this in my laundry soap recipes. :)
 |
| Baking Soda is something that you can find at every grocery and most often fully stocked. |
 |
| I got rid of my non stick cookware so I use my glass pyrex set. Doesn't stick and works fine. |
Saturday, October 22, 2016
DIY Fruit Fly Deterrent
With the unusually warm weather that has extended into October I noticed that I have an unusual amount of fruit flies around my house. There is a simple and easy method you can use to get rid of them. There are a few DIY methods but this is the one that I use because I always have the ingredients on hand.


Items needed:
-Small dish
-Apple cider vinegar
-dish soap
Pour about 1/3 cup of apple cider vinegar in the small dish. Then add a few drops of dish soap into the apple cider vinegar and stir. The dish soap breaks the water tension and as soon as the fruits flies touch the surface, they get sucked in and drown. Doesn't sound very nice and I do like nature but nothing made me happier yesterday then looking at the bottom of my small dish and seeing those little suckers. LOL


I made 3 of these, 1 for my kitchen counter, 1 for my stove top and the last for my dining room table. It does not smell the best but trust me when left over night, it is worth it. You might have to leave this out a few days if you have a lot like we did. Hope this works for you! :)
Friday, October 21, 2016
The Signs of Thyroid Disorder
Many physicians are not fully trained to understand some of the signs and symptoms of thyroid disorder. Luckily when I went to my doctor that was the first thing that was tested but that is not the case with everyone. It's good to know some of the signs of hyperthyroidism and hypothyroidism so that you can get diagnosed and treated right away. These are the signs that I pulled directly from the book that I reading right now The Thyroid Solution.
Signs of Hypothyroidism:
-general tiredness
-weight gain
-aches and pains in joints and muscles
-muscles cramps
-constipation
- thickened skin
-dry and pale skin
-brittle hair
-hair loss, including loss of eyebrow hair
-feeling cold even in warm temperatures
-milky discharge from the breast
Signs of Hyperthyroidism:
-weight loss (or less commonly, weight gain)
- fatigue
-shakiness
-feeling hot and becoming intolerant of warm and hot temperatures
-increased thirst
-hair loss
-eye irritation
-increased sweating
-rapid heartbeat, palpitations
-muscle weakness, decreased muscle mass
-irregular periods, decreased fertility
Someone with a thyroid imbalance can show these signs but are not limited to the signs that fall under hyper or hypothyroidism. I'm hypothyroid but have shakiness, feeling hot all the time, increased thirst, palpitations and muscle weakness while still showing most of the signs from hypothyroidism. Also remember that some of these symptoms can be related to other diseases as well but it's an easy blood test and one that gets overlooked sometimes.
Even when your treated and your levels are back to normal you can still show symptoms. I still have anxiety, hot flashes and heart palpitations. Even if your TSH levels are normal, it does not mean that you are in the clear. If you have been tested and are still showing normal results, ask your doctor to test your Free T3 and Free T4. The test might come back normal but it can also come back out of whack. It's just blood work and doesn't hurt to test, and at least you could rule it out if the results came back normal. Do a lot of research on this if you think that you may have a thyroid disorder. I've been hypothyroid for 8 years and there are still things that I am learning. Don't leave your health in the hands of one person because you are far too important. And on that note, have a happy Friday! :)
Thursday, October 20, 2016
Natural Sweetener - Alternatives to White Sugar
White sugar is something that I replaced in my cupboard with raw sugar. It's less processed and white sugar is essentially bleached of it's colour with chemicals. There are many natural sweeteners that you can find such as:


1) Raw Unpasteurized Honey: If you read the labels of some of the brands of honey that they sell in grocery stores and it's a wonder that they can even call it honey. You want raw unpasteurized honey. I buy mine at our local farmer's market.
2) Raw Sugar: Has a light brown colour to it. Can be found in the same aisle as the white and brown sugar.
3) Coconut Sugar: You can find this at stores like Bulk Barn but is a bit on the pricey side
4) Agave Syrup: I buy mine in the health section at my grocery store or at Bulk Barn.
5) Stevia extract: Make sure that you read the label and see that the extract is 100% from stevia leaf. There are a few products that you will find in the sweetener section but have more chemicals than the stevia plant itself. Read read read labels! You can find this at your local health store.
6) Maple Syrup: Make sure it's 100% natural, will be more expensive than other syrups sold for your pancakes, but worth it. You can find at the grocery store or your local farmer's market.
My personal favourite is the Agave Syrup. I use this to make my homemade oat bars and I find it works better than honey. Would definitely recommend trying this.


I tried the same bar recipe with honey and found that it came out a bit crunchier. For me, the agave syrup gave a chewier feel to the bar and tasted better with the ingredients in it. Give them all a try. :)
Wednesday, October 19, 2016
DIY Hairspray
One of the products that I ditched early on in my journey to going more natural was hairspray. I couldn't believe how many easy recipes there were and all with ingredients you normally have in your house. Here is one way to make your own hairspray.


- Cut up an entire orange in smaller piece and place in a pot
- Add 2 cups of distilled water and bring to a boil. You use distilled water because you want to preserve your hairspray as long as possible so there can't be any contaminates in the water.
- Boil down until the water has reduced to about half
- Allow to cool and strain
- Place in a spray bottle with a tsp of alcohol to preserve and a few drops of essential oil if you want a scent. I just leave it plain. I've tried ylang ylang before and that was a nice smell.


This hairspray does not dry right away but after a few minutes you will get store quality crunch I promise. LOL Typically you would use an orange for darker hair and lemon for lighter as lemon can actually lighter your hair. I find this hairspray goes a long so if you try this I wouldn't make too much as you would not want it to go bad. The alcohol acts as the preservative but it's still food and will not have the shelf life of chemicals in store bought hairspray. This recipe is a keeper in my house. :)
Tuesday, October 18, 2016
The Thyroid Saga Continues
As I mentioned in my profile, I've been hypothyroid for about 8 years now. It was almost 2 years after the birth of my daughter and I still couldn't fight the unexplainable fatigue. It took everything out of me just to do my day to day routine and I was pretty close to falling asleep at my desk a few times. I had 2 children and could not live like that any longer and finally went to the doctor. I was slowly introduced to Synthroid, increasing my dose 0.025 mg every 2 months until I reached 0.088 mg which I stayed at for 7 years.
Even though my levels were fine I still felt some of the symptoms and not those that are typical of hypothyroid. I experienced the dry skin, hair, brittle nails, fatigue, muscle weakness which are normal for hypo. But I also had a lot of anxiety and would get hot flashes. I'm talking hot flashes where it felt like an inferno was building inside of me that I just couldn't reach. I've stood outside in the middle of winter before Christmas dinner just to cool myself down. And the flashes would go as quickly as they came.
Around March of this year I noticed that something was off and I made the stupid decision to take myself off of my meds. I was starting this new "going natural" lifestyle and seriously thought that I could just quit the meds cold turkey as long as I ate well. Boy was I wrong! I had the right idea because essentially meds only cure the symptom of a disease but they don't address the cause. Something caused my thyroid to stop functioning. At this point it is probably too late to reverse but I still wanted to fully understand why. I stuck it out with no meds up until the end of September and then finally had to drag myself back to the doctor and tell her what I had done. Needless to say she was not impressed and when my blood work came back, I actually was feeling so bad in March because I needed more thyroid hormone. My doctor bumped my meds to 0.1 mg with the plan to slowly progress to 0.125mg.
Eventually I would like to see a naturopath and get their take on thyroid healing but for the time being I have accepted that I have to be on something. I wanted to be on medication that was more natural and asked my doctor to switch me to Armour. This is made from animal thyroid glands which provides T3 and T4 whereas Synthroid only provides T4. Even though my T3 levels are fine, the majority of blogs and websites show patients feeling a big difference between the two and prefer Armour. It took a bit of convincing and depending on what country you live in, your doctor might not even allow this natural alternative. Luckily my doctor went for it and I've been on this medication for 2 weeks now. My prescription of Synthroid 0.1 mg converted to 60 mg of Armour. The plus side too is that Armour starts to work within an hour after consumption where Synthroid takes up to 4 hours. I will be tested in 2 weeks to see how much more I need to my levels back to normal.
During the process of going back on my meds, I found this book on-line called The Thyroid Solution by Ridha Arem, M.D. and it was such an eye opener to all possible things that could cause thyroid disease such as iodine deficiency, stress and even emotions. Just like it says on the cover of the book, getting control of your thyroid disease is about "regaining your emotional and physical health".

I'm about halfway done this book and there is so much information on things you can do to help promote thyroid health. I would definitely recommend this to anyone who suffers from any type of thyroid or autoimmune disease: hypothyroidism, hyperthyroidism, Hashimoto and Graves disease as well. I just had to share this as I know that I am among many that struggle with this. Medication doesn't mask everything and keeping a healthier lifestyle is so much harder when you can barely get yourself out of bed to workout. That's my struggle right now. I had been on a steady workout routine for 2 years. Me and my Jillian Michaels DVDs kicked some serious butt every morning at 5:45am but and when my thyroid started acting up I could barely wake up for 7am let alone 5:45am. I completely stopped and gained about 20 pounds. For the past month I've managed 2 to 3 workouts a week but it's still bit of a struggle. I'm hoping when my Armour dose is increased that I will find that extra bit of energy that I have been missing for so long. For me workouts have always been mind over matter but when your mindset isn't fully there, it just doesn't work. And just like the title of this post, the thyroid saga continues..... :)
Monday, October 17, 2016
New Soap Recipe - 100% Coconut Oil
So I'm fairly new to the cold soap process. I've made about 1/2 a dozen batches of soap and have a pretty good understanding now of the reaction between lye and water as well as tracing. The only thing that I was looking for was a soap recipe that wouldn't make my soap bars turn to mush after halfway used up and was probably my lack of understanding on the recipes I was choosing on-line. I experimented with a few different ratios and the last batch I made wasn't too bad which was equal parts of coconut oil, olive oil and lard (Crisco). I try to keep my recipes simple as these are just for my own personal use and want to make sure that the ingredients are easy to find locally. I did some research and found that some people use 100% coconut oil and superfatted at 20% which pretty much goes against the rules of soap making but people swear by the results. I tried a batch this weekend and even after the first day it was just as hard as the soap that you would find at the store. There was a really good lather and felt good on my skin. Success!!
Typically you have to wait 4-6 weeks with the cold process method to wait for the lye to cure out of the soap. I use the hot oven process where you keep the temperature of the soap above 160° for about an hour. This speeds up the curing process. There are a few DIY ways to check if the pH is too high before using if you don't want to buy ph papers or like me didn't even know where to look for them. The old method from way back in the day is to do the ZAP test where you stick you tongue on the soap. If it zaps like when you put your tongue on a battery, there is still too much lye in your soap and is not yet safe for use. Another way is to puree red cabbage into distilled water, then filter the solids out. It is important to use distilled water as there are no contaminates it it. Put a few drops of the filtered liquid directly on the soap and if the liquid is still lye heavy it will turn green. If the soap is balanced it will turn blue. I've tried both methods and work, only depends if you have red cabbage on hand. Here are some pics below but please don't judge as I took these pictures when I did my first batch so the soap is not so pretty. LOL
 |
| These are the soap bars removed from their mold the next morning. |


Sunday, October 16, 2016
DIY Laundry Soap
 |
| The white bars on the right are the coconut oil bars superfatted at 1% |
 |
| Final product with mixture of grated soap, baking soda and citric acid. |
Subscribe to:
Comments (Atom)